
 Retaining walls look like simple stacked stone, timber, or concrete block structures, but they are carefully engineered systems that wage an ongoing battle with gravity. They make slopes more usable, help control erosion, and create terraces for landscaping and infrastructure. Before starting, contact your local utility service to have all underground lines marked. Once that is done, begin by laying the first course.
Digging the trench is one of the most important parts of Retaining Walls Charleston SC installation. This is because it is the first step in laying the foundation of the structure, which will determine how strong and stable your finished wall is.
Before digging, it’s a good idea to map out the area of your new retaining wall with stakes and string or even spray paint. This will help you visualize where the blocks are going to go, especially if your retaining wall has any curves in it. It’s also a good idea to call your local utility company before beginning any digging, as they will be able to mark where any underground cables or pipes are located.
If your retaining wall is going to be more than 4 feet tall, you will need to install a drain pipe. This is particularly important if your soil type is clay-based or wet. This is because these types of soils can hold a lot of water, which can cause problems in the long run.
To prepare the base, dig a trench that is approximately four inches deep and wide enough to accommodate the block style you are using (see Base Thickness Chart below). Replace the dirt with a layer of clean granular material, such as crushed rock or gravel, and compact it down by tamping or walking on the surface. Repeat this process for each row until you reach the desired height of your retaining wall.
It’s a good idea to use a vibrating plate compactor for this step, as it will help you get the job done faster and more efficiently. It’s also a good idea at this point to add the perforated drainage pipe, which will be buried behind the backfill and allow water to drain through it as needed.
Choosing the Blocks
After digging your trench and putting in a base, it’s time to start laying the blocks. You want to use quality blocks for retaining walls as they are made to withstand the pressure that will be exerted on them.
You should also use blocks that are made to fit together, preferably with a female groove on one side and a male groove on the other. This helps ensure a tight fit that will hold your wall together as it goes up. It’s also important to make sure the blocks have the correct height. If you’re building a taller wall, it’s a good idea to offset each block slightly back from the one below it, like very shallow stair steps. This will help prevent the soil from pooling behind your wall and potentially causing damage.
It’s also a good idea to plan for drainage when you’re choosing your blocks. Wet soil weighs more than dry soil and a retaining wall that doesn’t have a drainage system can erode quickly. This can damage the structure of your retaining wall as well as other areas in your yard. This can be avoided by including drainage in your retaining wall design or adding drainage channels after the fact.
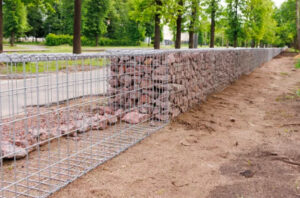
While many retaining walls are built using concrete blocks, stone is another option that can add character and charm to your home’s exterior. This material is available in a variety of colors and iconic shapes that can fit in with your landscape design. You can even purchase stacked blocks in a wide range of styles to create an architectural look for your retaining wall.
Leveling the Base
Retaining walls are often used to make slopes more usable, or to prevent erosion, but their most important function is that of absorbing and redirecting water and soil pressure. This creates an enormous amount of pressure that can easily cause a wall to fail if not properly addressed. To mitigate this pressure, the backfill material must be porous and able to drain away quickly. Ordinary dirt is generally too dense and can actually increase the force that is exerted on the wall during heavy rains. Using gravel or sand for the backfill is recommended, as it provides an easy outlet for drainage and can significantly reduce this pressure.
To prepare the base, dig to the lines and grades you have established for the retaining walls. Spread a layer of sand or gravel that is approximately 4 inches thick and compact. Some professionals also add a layer of landscape fabric to prevent sand seepage into the backfill.
When laying the first course of blocks, it is crucial that they are level both front to back and side to side. Using a long piece of 2×4 laid across the top of the block is an excellent way to check for levelness. A rubber mallet is helpful to tap each block into place.
Once the level, first course is set, pour and compact your drainage backfill. Be sure to fill the entire area behind and in front of each block course, as well as any areas left at the bottom of the retaining wall. Typically, a maximum of 12″ of drainage aggregate should be placed behind each retaining wall course. This is especially important if your retaining wall design features a steeper slope or if it will be used as a seatwall.
Stacking the Blocks
Retaining walls can be built from a variety of materials, including stones and interlocking concrete blocks. The type of material you choose depends on your preference, budget and skill level. Poured concrete tends to be the cheapest option per square foot, but can require professional installation. Interlocking blocks are less expensive, and offer a more consistent look. Once you’ve chosen your material, you’ll need to dig a trench and apply a base layer. This step is a crucial part of retaining wall installation. It helps ensure that the wall will be sturdy and stable.
First, use a long carpenter’s level to check that the gravel base layer is even. If it isn’t, the walls will be uneven and unattractive. Next, spread a 2-inch layer of sand or gravel over the base. Using the carpenter’s level again, make sure it’s level from side to side and front-to-back. This will set the stage for the rest of your retaining wall.
Place your first course of blocks on the sand or gravel. Press them firmly into the base, and use the carpenter’s level again to make sure they’re even from side to side and front to back. The first block does the most work, and it will set the standard for the rest of your wall. If it isn’t level, subsequent rows will be off as well.
Install the remaining courses of blocks in a “running bond” brickwork pattern, and check for level as you go. Some blocks have angled sides that allow for gently curved walls. To ensure consistency and structural integrity, start every other row with a half block (or the amount required by the manufacturer). This will stagger the seams and provide a stronger and more stable wall.
Finishing the Wall
Retaining walls may look simple stacked stone, block, or timber structures, but they wage an ongoing battle with gravity and restrain tons of soil that would otherwise slump, slide and damage foundations or landscape features. They can increase usable outdoor space by terracing sloped properties and enhance curb appeal with an attractive backdrop to garden areas, patios and pools.
When properly built and waterproofed, retaining walls provide long-lasting, safe landscape solutions. While a well-meaning do-it-yourselfer can build some retaining walls, the complexity and longevity of the structures require precision work and strict adherence to manufacturer’s recommendations. It is also a good idea to hire a professional, especially when building retaining walls in unstable or hazardous locations.
Before starting your project, contact the local utility company to mark any underground lines or cables. You will need to dig down at least four feet for most retaining walls and this can easily damage or disrupt any utilities that run through the area. Once the retaining wall area has been marked, use stakes and string to lay out the perimeter of the structure. This will help you determine the height and length of the walls.
Shovel in the backfill material one tier at a time as you build the wall, and be sure to compact thoroughly. When you reach the desired height of the wall, use a level to make sure it is straight and even. Then, place a piece of landscape fabric over the backfill and compact again.
Once the landscape fabric and retaining wall blocks are in place, you can install the top course of stones. It is important to use a quality paving stone that will last as long as the retaining wall. If you choose a brick, slate or natural stone, be sure to use an adhesive and grout that will hold up under the weather conditions where you live.