post

The Benefits of a Concrete Driveway

Concrete Driveway Colorado Springs is a great way to improve the value of your home. However, working with a reputable contractor ensures the project is completed properly.

To determine how much concrete to order, create a scale drawing of the driveway. Then, divide it into a series of rectangles and calculate the area for each.

concrete driveway

Concrete is a highly durable material, but it can be expensive. The cost of a concrete driveway depends on several factors, including its size and design complexity. The larger the driveway, the more labor and materials it will require. The location of the driveway can also impact its cost. For example, a driveway built in a cold climate will need to be thicker than a driveway in a warmer one. The thickness of a concrete driveway can also affect its durability and longevity.

A basic concrete driveway costs about $8 to $12 per square foot, including labor and material costs. The cost of a stamped or stenciled concrete driveway will increase the price by $10 to $15 per square foot. If you want to add color to your concrete driveway, the cost will rise even more.

If you’re considering a concrete driveway, be sure to choose a contractor that is licensed and insured. A licensed contractor will have experience in working with concrete, and will be able to provide you with quality service. They will also be able to provide you with an accurate estimate for the project. They will also be able to answer any questions you may have about the process.

When building a concrete driveway, the contractors will first prepare the area. They will dig out the old driveway and then lay down gravel or crushed stone to create a base for the new concrete. They will then use a vibratory plate compactor or rammer to level the base and fill soft spots. They will then add rebar to strengthen the concrete.

Then, the concrete will be poured. The concrete will be allowed to cure. Once it’s cured, the forms will be removed. Labor makes up about 40 percent of the total cost of a concrete driveway. The labor cost includes the excavation, laying and smoothing the concrete, and removing the forms.

Many homeowners opt for a concrete driveway because of its durability and low maintenance costs. However, it’s important to consider the environmental impacts of each option before choosing a type of driveway. For example, asphalt is made from petroleum, a limited resource that requires intensive mining and processing to extract. Moreover, it is not good for the environment because it produces a lot of air pollution. A concrete driveway, on the other hand, is a more environmentally friendly choice.

Concrete is a long-lasting material, and a well-constructed concrete driveway can last for decades. However, like other materials, it requires proper maintenance to extend its lifespan. The type of concrete you use for your driveway, as well as the climate where you live, will play a role in how long it lasts.

To ensure your concrete is as durable as possible, start with the right prep work. The ground should be level, free of organic material, and properly graded. Also, make sure the base layer is compacted. If you’re using a concrete mix that contains de-icing salt, it’s important to spread the salt evenly to avoid corroding the steel reinforcement bars.

Another factor that influences the durability of a concrete driveway is how much weight it supports. If you’re parking multiple cars, trucks, or other heavy vehicles on your driveway, it’s important to choose a concrete that’s designed for the load. For instance, a reinforced concrete mixture is stronger than regular concrete and has a higher load-bearing capacity.

Concrete is an extremely strong material, but it can crack over time if the surface is exposed to excessive stress. The best way to prevent this from happening is to install a proper drainage system. Ensure your gutter downspouts are directing water away from the driveway and that any sloped areas are sloping correctly.

A properly installed concrete driveway should also be protected with a high-quality penetrating sealer. This will help protect the concrete from stains, sun damage, salt, and moisture.

In addition to protecting your concrete, a sealer will help keep the driveway looking new for as long as possible. It’s recommended that you apply a new coat of sealer every 3-5 years.

Unlike asphalt, concrete is not susceptible to heat or sunlight. This makes it a great choice for hotter climates, where other materials may deteriorate due to high summer temperatures and UV rays. This is also an advantage for those who want a driveway that’s easy to clean and maintain.

Concrete is a very durable material, and it can last a long time with proper care. It is also relatively inexpensive compared to asphalt or pavers. However, like any other surface, it requires periodic cleaning and inspection to maintain its beauty and strength. Regular cleaning with a broom or power washer can remove dirt, leaves, and other debris that can stain the surface. In addition, removing oil, gasoline, and chemical spills promptly will prevent the concrete from absorbing them, which can cause discoloration and deterioration over time.

Using caulking to seal cracks and gaps is another simple maintenance task that should be performed regularly. It is important to use a quality caulking that is designed for outdoor use, and to follow the product instructions for application. A driveway with cracks and chips is unsightly, and they can also allow water to penetrate the concrete and cause damage.

In the winter, it is important to remove snow and de-ice your concrete driveway. While salt is effective in reducing ice, it can damage concrete surfaces. New concrete is particularly susceptible to damage from the chemicals in rock salt. Other de-icing products, such as sand, coffee grounds, or alfalfa meal, are safe to use and less damaging to the concrete.

It is also important to sweep the concrete regularly and to remove organic debris from the surface. Sweeping will reduce the accumulation of water that can cause stains or encourage algae to grow. It is a good idea to park vehicles and equipment away from the edges of the concrete, as these are the weakest areas. It is also a good idea to have a professional re-seal the concrete every five years. This will protect the concrete from abrasion and help to prolong its lifespan.

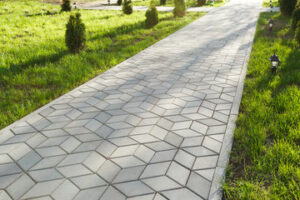
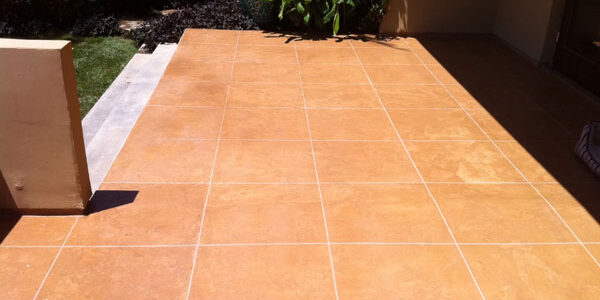
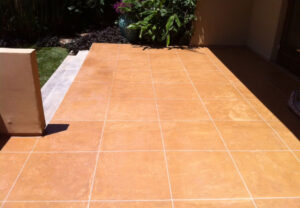
Concrete is a popular choice for driveways because it is durable and comes in a range of design options. The appearance of a concrete driveway is important to many homeowners, as well as the overall look and curb appeal of a home. The appearance of a concrete driveway is enhanced by a variety of design and finishing techniques, including the use of colored concrete and different texture finishes. These options can also help a concrete driveway stand out from the competition and improve the value of a home.

In addition to being a sustainable and cost-effective alternative to asphalt, a concrete driveway is also environmentally friendly. The majority of raw materials used to make a concrete driveway come from natural rock and sand, recycled aggregates, and cement. Depending on the supplier, it is possible for concrete producers to recycle industrial byproducts such as fly ash and ground blast furnace slag. This reduces raw material consumption and keeps waste products out of landfills.

A concrete driveway has the option of being finished with a broom, sprayed, or stamped surface to create a unique look for your home. The broom finish adds a subtle texture that helps with traction. A spray application of concrete color or concrete stain can provide a beautiful finish and hide dirt or stains. Stenciling allows homeowners to imprint a monogram, circle or other design into their concrete driveway.

When compared to an asphalt driveway, a concrete driveway requires less maintenance to keep it looking its best. Because of its light color, a concrete driveway does not require the regular sealing and resurfacing that an asphalt driveway needs to stay in good condition. An occasional power washing with a lower psi can remove dirt and grime from the surface of a concrete driveway.

The natural beauty of concrete makes it a beautiful complement to any home. With its clean lines and modern minimalist aesthetic, a concrete driveway can be the perfect backdrop for landscaping rocks and plantings that enhance the beauty of your property.

A concrete driveway has the option of being coloured to match other decorative outdoor elements like a patio or walkways around your home. A professional concrete contractor can tint the concrete during installation, or add a colour afterward to achieve the desired look.

post

Residential Deck Repair

Building a deck is one of the simplest construction projects homeowners can undertake. However, working with your town building department to get a permit and ensure that the deck meets structural requirements is important.

When your deck needs repair, Deck Repair Charleston SC can perform an inspection to check joists and another framework. A contractor can also recommend and install any customizations to make the deck more functional.

residential deck repair

All decks must have some sort of foundation that can support the weight of furniture and people. Over time, many factors can deteriorate a deck’s foundation. Seeing signs of an unstable deck means it’s time for a professional to inspect the structure and correct any problems.

Most decks are built on concrete footings. These pads, which are underneath the posts that hold up a deck, must be in stable soil to avoid damage to the entire structure. But constant changes in temperature and weather conditions can cause footings to shift or even crack. Depending on the problem, replacing these footings may be necessary to restore a deck’s stability.

Decks that sit on sloped ground need to have strong footings to prevent heaving, which can cause the deck to sag and become unsafe to walk on. A sloped deck also needs to have the proper ledger board that attaches it to the house frame and keeps water away from the wood. If the ledger board is missing or damaged, it will need to be replaced with a new one that meets building codes and is safe for a deck.

A bare wooden deck, even if it’s pressure treated, will rot over time unless protected with a stain or sealant. It’s a good idea to apply a sealant once or twice a year, but it’s especially important to do so before any major changes in weather.

While it’s common for trees to shed limbs due to age or storms, large limbs falling on a deck can be dangerous and may cause structural damage. Keeping trees and other vegetation away from a deck is a good way to avoid this issue.

Some homeowners choose to use screw piles as their deck footings. These manufactured piles are screwed down into the soil below the frost line, which can help prevent heaving. Installing screw piles can be expensive and requires the use of hydraulic machinery, so this type of footing is best left to professionals. A residential deck repair company will have access to this equipment and can install a screw pile system that’s affordable and strong enough for most homes.

If your deck is elevated or has stairs, it’s important that you regularly inspect the railing to ensure it’s secure. Loose handrails are a safety hazard that can fall off and cause injury to your family. This is especially true if you have young children that use the railing often. Fortunately, most loose railings can be fixed with some simple steps.

If you’re dealing with a loose handrail, the first thing to do is check to see if it is only loose at one point, such as where it meets a wall or another stretch of railing at a corner. If the problem is at this point, you can tighten up the connection using construction glue and a caulking gun. Once the joint is dry, you can use a galvanized screw to ensure it stays together.

In other cases, the problem may be that the railing is loosened at its base. This can happen due to pressure on the railing from people leaning against it or snow piling up on it. In this case, you can add additional support by installing post skirts like these (on Amazon) or hammering in extra screws into the posts to keep them from pulling out of place.

It’s also a good idea to install extra blocking in a zig-zag pattern between the rim joists of your deck. This will prevent the joists from moving in the future and could help you avoid having to replace your deck.

Some homeowners choose to use plastic railings on their decks, which offer several benefits. They’re affordable, don’t rust, and can be a great option for coastal homes that experience high amounts of moisture. However, they’re not as durable as metal, and they can be prone to warping or breaking under pressure.

If you’re dealing with a plastic railing that’s loose, it might be time to replace it. Depending on where you live, your deck might need to be higher than average to meet local code requirements for railings. In these situations, it’s a good idea to consult with an experienced professional to make sure your deck is safe.

If you’re not careful, pests can destroy your deck and make it unsafe to use. Wood insects like termites and carpenter ants can weaken the structure and damage the boards. You may notice signs of an infestation such as mud tubes, swarming, or hollow sounding wood. It’s best to call a professional pest control company to treat the problem before it gets worse.

If the infestation is extensive, your contractor may recommend replacing your entire deck. For smaller infestations, you can repair the damaged areas with wood glue, patching, or filling. You should also check for other signs of insect damage such as swarming, wood flakes, and hollow sounding wood.

Carpenter bees are another type of wood-destroying insect that can damage your deck. These solitary bees bore perfectly round holes into wooden surfaces including decks to create nesting sites. Although they don’t eat the wood as termites do, their drilling can weaken it over time. You can tell if you have a carpenter bee problem by looking for small holes about half an inch in diameter, sawdust beneath the holes, and the presence of bees hovering around the deck.

Rodents can also cause serious damage to your deck and spread diseases through their droppings. Seeing rats and mice scampering about the deck can be extremely unsettling, not to mention the fact that they can chew through the wood of your deck, which can compromise its structural integrity.

Wasps can also be a problem. They build their nests in nooks and corners of your deck, which can be an eyesore as well as a nuisance. They are also a safety hazard because they can sting you if you get too close to them.

To prevent pests, regularly inspect your deck and repair any cracks or holes. Also, choose exotic tropical hardwood such as ipe, cumaru, or garapa for your deck construction to make it less appealing to insects. You can also install a bug lantern or a citronella candle to repel bugs and other pesky critters. Lastly, clean up trash, crumbs, and spills promptly.

Mold and mildew are an issue for all types of decking materials, and any appearance of either will require immediate attention. The good news is that you can control two of the conditions needed for mold growth: food (dirt, pollen and other organic material) and moisture. The best way to keep your deck from getting moldy is to sweep it regularly and to use a dehumidifier when the weather is hot and humid.

If the area of your deck where the mold is growing is stained or painted, you can apply a cleaning solution and scrub it thoroughly. You should also be sure to wear protective clothing, including safety goggles, rubber gloves, an air mask and work pants. Prolonged mold exposure can cause health issues, including breathing complications, memory loss and headaches. In severe cases, people who are particularly sensitive or have preexisting health conditions may experience more serious symptoms.

The treatment for black mold on decks varies depending on how much has grown, its severity and where it is located. For example, if the mold is on or under your deck, it is likely that water and moisture are building up there due to improper drainage or grading. If this is the case, you can fix this by installing a drainage system and adding ventilation to allow trapped moisture to escape.

On the other hand, if your deck is showing signs of dry rot, this requires different action. Dry rot is a fungus that grows in moist wood, and it can be identified by the brittle, warped and damp appearance of the boards as well as by a musty odor. This type of fungus can destroy your deck if left unchecked, and it must be treated as soon as you notice it.

If you have a wood deck that is not stained or painted, a simple mix of vinegar and baking soda will effectively remove the mold and will also disinfect the area. This should be applied with a brush or sprayer, followed by a hose rinse to clean away any residue and prevent mold from returning.

post

Why Hire an Electrician?

Electrician prepares, assembles, installs, and repairs electrical wiring, fixtures, and control devices. They work for electrical contractors or building maintenance departments or are self-employed.Electrician

Faulty wiring is a fire waiting to happen, and lousy workmanship can leave you with hefty bills for remedial work. To find an electrician you can trust, ask for recommendations and check out their online reviews.

An electrician handles the installation, repair and maintenance of electrical wiring and systems. They must have a thorough knowledge of electrical codes and safety procedures. An electrician must also have excellent communication skills to interact with customers, assistants and other crew members. An interest in subjects like math, science and physics is important for this career.

A high school diploma is the minimum educational requirement to become an electrician, although many vocational and technical schools offer career diplomas or associate degrees in electrical technology. These programs often include classroom instruction and lab work, followed by an apprenticeship where the student works under the supervision of a licensed journeyman electrician. Some programs also provide the opportunity to take state licensing exams at the end.

Most electricians start their careers as helpers, working under the guidance of a master electrician. As they gain experience, they may earn promotions to apprentice or journey worker. They can also choose to seek out their own apprenticeship opportunities through trade schools, independent electrical contractors or Associated Builders and Contractors. A journey person can also apply to become a master electrician after completing three years of experience and passing an exam.

Some electricians specialize in particular types of electrical systems. Residential wiremen install and maintain electrical wiring in homes, while inside wiremen do the same for commercial and industrial structures. Outside linemen spend their time outdoors, installing and maintaining cabling that runs from power plants to individual buildings. Telecommunications electricians lay wiring for phones and computers.

Electricians must have a strong understanding of blueprints, the technical diagrams that show where every wire is going. They also must be able to use hand tools, such as screwdrivers, pliers, knives and hacksaws, as well as power tools like drills and saws. In some states, including electricians must pass a written and practical exam to get their license. In addition to passing the test, electricians must have at least 7.5 years of experience in the installation, alteration and repair of wiring and appliances for electric light, heat and power in or on buildings and comparable facilities.

Licensing

Before any electrician can work professionally, he must get licensed. The licensing requirements vary by state, but they usually include apprenticeships, coursework and on-the-job training. The first step is an apprentice program, which generally combines classroom courses with hands-on instruction, typically under a journeyman electrician. This can take about four years to complete.

Once an apprentice has completed his training, he must pass an exam to become a journeyman electrician. The journeyman is then allowed to work on larger and more complex projects without supervision, and he is often the person who oversees other electricians on the job site. Some electricians choose to further their education by going to trade school or completing coursework that leads to a degree in electrical engineering or other relevant fields. These degrees can help them advance in their career and can help them earn higher salaries.

In some states, formal schooling helps to fast-track the journeyman’s license process. However, you must have seven and a half years of experience as a journey worker and pass an examination. Some electricians also pursue professional certifications to boost their resumes and make them more marketable to employers. These may include obtaining certificates in green energy, power testing or fire alarm systems.

Another important consideration for any electrician is insurance coverage. Liability insurance can protect them in the event of a lawsuit, which is a common risk of any business. In addition, it’s a good idea to have errors and omissions (E&O) insurance. This type of policy protects electricians against claims made by clients for damage caused to installations or electronic goods by an error committed by the electrician.

Electricians should also consider getting general business insurance, as well as workers’ compensation and disability insurance. This can help protect them against any unforeseen events that may occur on the job, such as property damage or injury to themselves or others. In addition to these types of insurance, it is also a good idea for electricians to have professional liability insurance. This will provide protection in the event of a dispute with a client over payment or quality of work.

Insurance

Having insurance is an important part of running any business. There are a variety of policies available, and the type you need depends on your particular business needs. It’s also a requirement in some locations to carry certain types of coverage in order to be able to bid on contracts.

The insurance requirements for an electrician can vary from state to state. In general, a professional electrician should have general liability, commercial property, tools and equipment, and workers’ compensation coverage in place. The cost of these policies can vary depending on the number of employees, the type and amount of coverage purchased, and other factors. Often, bundling these policies with workers’ comp or commercial auto insurance can result in savings.

Liability insurance is generally a requirement for electrical contractors to be licensed in certain states. It is a way for the public to know that the contractor has financial resources available to cover damages caused by work performed. In addition, carrying a specified amount of liability insurance is sometimes a requirement when bidding on government construction projects to minimize the financial risks for the project sponsor.

In addition to general liability, an electrician should have professional insurance (Errors & Omissions or E&O) in place. This type of policy protects the company against claims made by clients that they have not been satisfied with the quality of the work performed. It may also help pay for legal fees if the business is sued over unsatisfactory work.

Fred worked as a construction electrician for over ten years, so when he received a windfall from an inheritance, he decided to start his own business. He began by purchasing a standard BOP and didn’t give much thought to risk management. As his business grew, he needed performance bonds and found an independent agent who was knowledgeable on the subject. He helped Fred get the right amount of coverage and explained other specialized products that are also available, such as surety bonds. This helped Fred secure the contract he needed to keep his growing business going strong.

Safety

While working with electricity may seem relatively safe if done correctly, it can also be dangerous. Electricians often work in large spaces or in cramped conditions with live electrical wires, which can lead to accidents and injuries if not taken seriously. These electricians must follow strict safety rules and procedures to prevent electrocution or fires.

One of the most important safety requirements for an electrician is personal protective equipment (PPE). This includes items such as hard hats, eye and hearing protection, rubber gloves and mats to protect against falling objects. It is crucial that these items are inspected regularly to ensure they are in good condition.

Another essential safety requirement for an electrician is knowledge of the hierarchy of controls. This outlines the proper course of action when dealing with occupational hazards, starting with eliminating the hazard and moving down the list to engineering control, administrative control and finally, PPE. For example, an electrician should always try to avoid using a ladder that has metal side rails when working near power lines or electricity, as this creates a fire hazard.

Other safety requirements for an electrician include ensuring all exposed electrical parts are de-energized before beginning any work. This can be accomplished by following your company’s Lockout/Tagout procedures, or by shutting off the power to the affected area. Additionally, an electrician should never touch anything that is hot or has an exposed current. Doing so can cause burns or involuntary muscle contractions. Additionally, an electrician should not work in areas that are wet or damp as this can increase the risk of injury from electrical shock or arc flash.

In addition, an electrician must never use a screwdriver as a makeshift multimeter as this can lead to damage or injury. Similarly, an electrician should not operate machinery or work around it if they are not trained and qualified to do so. Furthermore, if an electrician feels that they are in danger of becoming shocked by an electrical current, they should immediately call their local utility company. Doing so can save lives and prevent serious injuries.

post

The Basics of Retaining Walls Installation

retaining walls
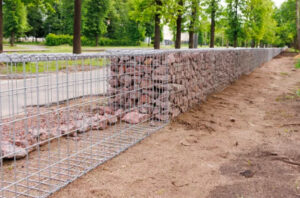
Retaining walls look like simple stacked stone, timber, or concrete block structures, but they are carefully engineered systems that wage an ongoing battle with gravity. They make slopes more usable, help control erosion, and create terraces for landscaping and infrastructure. Before starting, contact your local utility service to have all underground lines marked. Once that is done, begin by laying the first course.

Digging the trench is one of the most important parts of Retaining Walls Charleston SC installation. This is because it is the first step in laying the foundation of the structure, which will determine how strong and stable your finished wall is.

Before digging, it’s a good idea to map out the area of your new retaining wall with stakes and string or even spray paint. This will help you visualize where the blocks are going to go, especially if your retaining wall has any curves in it. It’s also a good idea to call your local utility company before beginning any digging, as they will be able to mark where any underground cables or pipes are located.

If your retaining wall is going to be more than 4 feet tall, you will need to install a drain pipe. This is particularly important if your soil type is clay-based or wet. This is because these types of soils can hold a lot of water, which can cause problems in the long run.

To prepare the base, dig a trench that is approximately four inches deep and wide enough to accommodate the block style you are using (see Base Thickness Chart below). Replace the dirt with a layer of clean granular material, such as crushed rock or gravel, and compact it down by tamping or walking on the surface. Repeat this process for each row until you reach the desired height of your retaining wall.

It’s a good idea to use a vibrating plate compactor for this step, as it will help you get the job done faster and more efficiently. It’s also a good idea at this point to add the perforated drainage pipe, which will be buried behind the backfill and allow water to drain through it as needed.

Choosing the Blocks

After digging your trench and putting in a base, it’s time to start laying the blocks. You want to use quality blocks for retaining walls as they are made to withstand the pressure that will be exerted on them.

You should also use blocks that are made to fit together, preferably with a female groove on one side and a male groove on the other. This helps ensure a tight fit that will hold your wall together as it goes up. It’s also important to make sure the blocks have the correct height. If you’re building a taller wall, it’s a good idea to offset each block slightly back from the one below it, like very shallow stair steps. This will help prevent the soil from pooling behind your wall and potentially causing damage.

It’s also a good idea to plan for drainage when you’re choosing your blocks. Wet soil weighs more than dry soil and a retaining wall that doesn’t have a drainage system can erode quickly. This can damage the structure of your retaining wall as well as other areas in your yard. This can be avoided by including drainage in your retaining wall design or adding drainage channels after the fact.

While many retaining walls are built using concrete blocks, stone is another option that can add character and charm to your home’s exterior. This material is available in a variety of colors and iconic shapes that can fit in with your landscape design. You can even purchase stacked blocks in a wide range of styles to create an architectural look for your retaining wall.

Leveling the Base

Retaining walls are often used to make slopes more usable, or to prevent erosion, but their most important function is that of absorbing and redirecting water and soil pressure. This creates an enormous amount of pressure that can easily cause a wall to fail if not properly addressed. To mitigate this pressure, the backfill material must be porous and able to drain away quickly. Ordinary dirt is generally too dense and can actually increase the force that is exerted on the wall during heavy rains. Using gravel or sand for the backfill is recommended, as it provides an easy outlet for drainage and can significantly reduce this pressure.

To prepare the base, dig to the lines and grades you have established for the retaining walls. Spread a layer of sand or gravel that is approximately 4 inches thick and compact. Some professionals also add a layer of landscape fabric to prevent sand seepage into the backfill.

When laying the first course of blocks, it is crucial that they are level both front to back and side to side. Using a long piece of 2×4 laid across the top of the block is an excellent way to check for levelness. A rubber mallet is helpful to tap each block into place.

Once the level, first course is set, pour and compact your drainage backfill. Be sure to fill the entire area behind and in front of each block course, as well as any areas left at the bottom of the retaining wall. Typically, a maximum of 12″ of drainage aggregate should be placed behind each retaining wall course. This is especially important if your retaining wall design features a steeper slope or if it will be used as a seatwall.

Stacking the Blocks

Retaining walls can be built from a variety of materials, including stones and interlocking concrete blocks. The type of material you choose depends on your preference, budget and skill level. Poured concrete tends to be the cheapest option per square foot, but can require professional installation. Interlocking blocks are less expensive, and offer a more consistent look. Once you’ve chosen your material, you’ll need to dig a trench and apply a base layer. This step is a crucial part of retaining wall installation. It helps ensure that the wall will be sturdy and stable.

First, use a long carpenter’s level to check that the gravel base layer is even. If it isn’t, the walls will be uneven and unattractive. Next, spread a 2-inch layer of sand or gravel over the base. Using the carpenter’s level again, make sure it’s level from side to side and front-to-back. This will set the stage for the rest of your retaining wall.

Place your first course of blocks on the sand or gravel. Press them firmly into the base, and use the carpenter’s level again to make sure they’re even from side to side and front to back. The first block does the most work, and it will set the standard for the rest of your wall. If it isn’t level, subsequent rows will be off as well.

Install the remaining courses of blocks in a “running bond” brickwork pattern, and check for level as you go. Some blocks have angled sides that allow for gently curved walls. To ensure consistency and structural integrity, start every other row with a half block (or the amount required by the manufacturer). This will stagger the seams and provide a stronger and more stable wall.

Finishing the Wall

Retaining walls may look simple stacked stone, block, or timber structures, but they wage an ongoing battle with gravity and restrain tons of soil that would otherwise slump, slide and damage foundations or landscape features. They can increase usable outdoor space by terracing sloped properties and enhance curb appeal with an attractive backdrop to garden areas, patios and pools.

When properly built and waterproofed, retaining walls provide long-lasting, safe landscape solutions. While a well-meaning do-it-yourselfer can build some retaining walls, the complexity and longevity of the structures require precision work and strict adherence to manufacturer’s recommendations. It is also a good idea to hire a professional, especially when building retaining walls in unstable or hazardous locations.

Before starting your project, contact the local utility company to mark any underground lines or cables. You will need to dig down at least four feet for most retaining walls and this can easily damage or disrupt any utilities that run through the area. Once the retaining wall area has been marked, use stakes and string to lay out the perimeter of the structure. This will help you determine the height and length of the walls.

Shovel in the backfill material one tier at a time as you build the wall, and be sure to compact thoroughly. When you reach the desired height of the wall, use a level to make sure it is straight and even. Then, place a piece of landscape fabric over the backfill and compact again.

Once the landscape fabric and retaining wall blocks are in place, you can install the top course of stones. It is important to use a quality paving stone that will last as long as the retaining wall. If you choose a brick, slate or natural stone, be sure to use an adhesive and grout that will hold up under the weather conditions where you live.

post

Tips And Considerations In Hiring A Paving Company

Certain tasks need the help of professionals and paving asphalt is one of them. Choosing the right contractor is vital to ensure the job will be done properly and within your budget.

In this article, we will discuss some tips and considerations for hiring Paving Companies Summerville SC.

paverReputation

Reputation is one of the most important factors to consider when choosing a paving company. A company with a good reputation will likely have a lot of experience and be well-established in their industry, which can lead to quality work. They should also be able to provide references from past clients. In addition, a reputable company should have a professional website and social media presence. Using paid advertising online can help boost a paving company’s online visibility and reach a larger audience.

Before hiring a paving company, it is essential to find out how long the company has been in business and what kind of projects they have worked on. Also, make sure they are licensed to operate in your state and have a valid insurance policy. Additionally, it is a good idea to ask them what materials they use for their projects and get a cost estimate from them. This will help you compare prices and choose the best contractor for your needs.

It is also important to look at the paving companies’ reviews on their websites and social media pages. This can give you an idea of the type of work they do and how satisfied their previous customers are with their services. You can also check whether they have a local office and whether they are registered with the Business Bureau.

Proactively collecting online reviews and using the Feedback First feature of Reputation Builder can help asphalt paving contractors improve customer service, prevent bad reviews from going online, and even increase their search engine optimization (SEO). However, it is important to note that not all customers will be happy with their paving job and may leave negative reviews.

Experience

A good paving company should have years of experience in the industry. They should also know how to lay a surface that is durable, long-lasting, and attractive. The best contractors are committed to providing high-quality materials, quality equipment, and expert crews for excellent results and customer experience.

In addition, they should be able to explain technical terms in simple and easy-to-understand language. This helps ensure that the client and contractor are on the same page and understand each other’s expectations. They should also be able to provide examples of past projects in their area and provide contact information of clients who can vouch for them.

It’s important to find out if the paving company you are considering has insurance coverage. If they don’t, you could be stuck with a hefty bill should a worker get hurt while working on your driveway. You should ask to see proof of insurance when you meet with the contractor and make sure it’s both general liability and workers’ compensation insurance.

It’s a good idea to ask about the number of employees and what type of equipment they use on their jobs. If you notice that a paving company has very few staff members, it may indicate they are not properly trained and lack the knowledge to handle your project promptly. Also, if they have outdated equipment, this may affect the quality of the job they do for you. It’s worth paying a little extra for a paving company that provides experienced personnel and high-quality equipment. In the long run, it will save you time and money. You will also be happy with the results of your paving project.

Insurance

It’s important to choose a company that is licensed and insured. This will protect you in case anything goes wrong during the project and ensure that they have the necessary resources to resolve any issues. A reputable contractor should also be able to provide you with references from previous clients that can attest to their work ethic and customer service skills. Ask them about their experience in asphalt paving, and be sure to read online reviews.

Another tip is to look for a paving company that has a local presence. This will make it easier for you to get in contact with them if you have any questions or concerns. In addition, local companies are likely to be accredited and involved in community groups, which can indicate business accountability.

It is also a good idea to check the amount of insurance coverage that a paving company has. You should look for a policy that covers both general liability and worker’s compensation. This will protect you in the event of any accidents or property damage that may occur during the paving process.

In addition to ensuring that your paving contractor has proper insurance coverage, you should also ensure that they have the appropriate licenses for their business. This will ensure that they have the necessary knowledge and expertise to complete your paving project safely and efficiently.

A reputable paving contractor will be able to explain to you what happens during an asphalt installation and give you an accurate estimate of the costs. They should be able to answer all of your questions and be open to suggestions during the project. A paving contractor should also be able to provide you with a written warranty for their services, and it is best to avoid contractors who require full payment upfront.

Licenses

When selecting a paving contractor, make sure to ask about their licenses and permits. This will help you avoid getting scammed or paying for work that isn’t up to par. Most reputable paving companies will have their licenses displayed on their website. They also have insurance coverage and workers’ compensation to protect their clients.

Another important factor to consider is whether or not the paving company has experience performing municipal jobs. There are many differences between residential and commercial paving, and it’s best to select a paver with the necessary experience for your project. It’s also a good idea to get estimates from several different contractors before making your decision. This will give you a clear idea of what your options are and will allow you to choose the one that’s right for your needs.

You should also ask if the contractor is a member of any professional organizations. This will ensure that they are up to date on industry trends and have the expertise to complete your job well. Moreover, it will also indicate that they have a strong support system in place to resolve disputes with customers.

Lastly, you should also inquire about the size of their crew and what equipment they use. An ideal paving contractor will have a team of skilled and experienced employees. This will ensure that the paving project is completed within the designated time frame. In addition, the quality of work will be excellent. Furthermore, a highly professional asphalt paving contractor will provide a warranty on their work. This warranty will cover issues that occur during construction or repairs, as well as offer maintenance tips and recommendations.

Pricing

Paving projects can be expensive, and it’s important to find the right company for your needs. You want a company that can provide quality results and will give you a fair price for their services. In addition, hiring a professional will often save you money in the long run. You’ll also avoid the headache of trying to do the job yourself.

Professional paving contractors have years of experience and expertise in the industry. They know what materials work best for each type of project and can recommend the best solutions for your budget. They also have the equipment needed to complete the job quickly and efficiently. In addition, they are familiar with the latest paving trends and innovations and can help you select the right material for your property.

Leaving your paving project to the professionals is also a great way to reduce your liability. Unfinished or poorly maintained pavement can lead to injuries for customers and employees. A reputable paving company will ensure that your parking lot is safe for everyone who uses it.

When choosing a paving contractor, it’s important to read reviews and testimonials from past clients. These will help you get a feel for the quality of their work and customer service. You can also ask for referrals from friends, family members, and coworkers.

When you choose the right paving company, your project will be completed promptly and within your budget. In addition, you’ll have peace of mind knowing that your paving job is backed by a satisfaction guarantee. This kind of peace of mind isn’t available with DIY projects.

post

The Benefits of a Wooden Fence

Wooden Fence NJ adds security and privacy to your home, as well as enhancing its beauty. However, a fence’s lifespan depends on its proper care and maintenance.Wooden Fence

Choose a type of wood that is appropriate for your climate and budget. Some types of wood are more resistant to rot and insects than others.

The durability of wooden fences depends on several factors, including the type of wood used to make them and how much maintenance they receive. Many types of wood are available, and the most durable options are hardwood and softwood. Hardwoods are typically more expensive, but they tend to be sturdier and more visually appealing than softwoods. In addition, they are more resistant to changes in temperature and weather conditions than softwoods.

The longevity of a wood fence also depends on its location and the climate it is in. For instance, areas with high sunlight may cause discoloration or degradation. Wet climates, on the other hand, can lead to rot and moisture damage. Wooden fences that are exposed to these conditions must be protected with paint and other protective measures.

Even if you do everything right, it is important to schedule regular inspections of your wooden fence to look for signs of deterioration. These inspections will allow you to catch any issues quickly so that they can be addressed before they get worse.

Another way to increase the durability of your wooden fence is to use a stain or sealant. Stains and sealants are a great option because they provide weather protection without covering the natural grain of the wood. They also give your fence a beautiful color and help protect it from UV rays.

When choosing a stain or sealant, choose one that offers both water and sun protection. This combination will keep your fence looking new and beautiful for as long as possible. Also, be sure to use a mildewcide to deter fungus growth. Additionally, be sure to inspect your wooden fence regularly for any signs of deterioration, such as cracks or splits.

Styles

Wood fences are available in a wide variety of styles to suit any home and landscape. In addition, you can choose from different stain colors to create the look you want. For example, gray is a popular option that allows the natural beauty of the wood to show through. Eucalyptus is another stain color that can be used to achieve a traditional or modern style. These colors work well with most homes and do not compete with other outdoor elements like flowers and shrubs. You can also choose from a variety of sheen levels for your wood fence to provide the perfect finish.

The main component of a wooden fence is the in-fill, which is the vertical panels or boards that form its screening. This panel can be built by hand or purchased as prefabricated panels that integrate their own horizontal rails, simplifying construction. Fence posts are sometimes allowed to extend above the in-fill panels, while other fences may feature decorative caps on their tops.

Supporting rails are another structural element found in many wooden fences. They perform a vital function in the structure of the fence, connecting the top and bottom rails. They are also aesthetically appealing, as they are clean and horizontal in appearance. Fences that use rails are often less expensive than those that use pickets or boards.

Lattice fencing is a more ornamental type of fence that uses crisscrossing strips of wood to form a pattern that is similar to a garden trellis. This is a great way to add privacy and a stylish touch to your home, but it is not as effective for keeping out intruders as other types of fence.

Customization

Wooden fences offer a wide range of customization options that allow homeowners to create the perfect outdoor space for their family. Variables like fencing height, gate width, and stain colors are all easily adjusted to suit individual preferences and the unique environmental constraints of the property. This flexibility makes wooden fences the ideal choice for homes of all sizes and styles.

A wood fence can be stained in a variety of shades to enhance its visual appeal. For example, a cedar privacy fence with a natural, semi-transparent stain highlights the warmth of the wood and evokes an elegant, rustic aesthetic. Other color options include dark stains that provide contrast and depth to the fence. These rich tones can make your home feel secluded and inviting, creating the perfect ambiance for relaxing after a long day.

Another way to customize your wood fence is to add decorative elements, such as lattice panels and post caps. These beautiful embellishments elevate the style of your backyard and showcase your attention to detail. They can transform your fence into a captivating canvas, turning your yard into an enchanting oasis for family and friends to enjoy.

In addition to a wood treatment or stain, you can also paint your wooden fence in a color that complements your house and landscape. For example, you could use black for a high-contrast look or choose a bright, bold hue to create a vibrant statement. Aside from enhancing the aesthetics of your wooden fence, these customization options also extend its life expectancy by reducing exposure to weathering and UV damage.

If you are interested in a more permanent design feature, consider adding carved wood. Skilled artisans can sculpt intricate patterns, motifs, and nature-inspired scenes directly into your wooden fence panels. Carved designs can either be subtle or make a dramatic impact, depending on your personal preference.

Aesthetics

Wooden fences are visually appealing, and they add a touch of style to any property. They are also a good choice for separating different areas of a yard, such as a patio from the garden. You can also use them to frame a pool or outdoor dining area. For example, a wood picket fence with a traditional white finish is a great way to create a cozy backyard.

In addition to their aesthetics, wooden fences are very easy to maintain. They can be stained or painted to change their appearance and protect them from the sun’s UV rays. This versatility makes them one of the best fencing materials.

Unlike chain-link metal fences, which often have a dull and unfinished look, wood fences add a natural charm to any property. Moreover, they are more affordable than many other types of fences. Wood fences are also an environmentally friendly option for homeowners, since they can be made from a wide variety of materials.

Pine wood is a popular choice for wood fences because it is strong and durable, especially when treated with preservatives. This treatment process increases the longevity of wood fencing and helps prevent damage from moisture, termites, and fungal decay. It is also resistant to rot, making it a smart choice for outdoor applications.

The aesthetically pleasing characteristics of wooden fences can be improved by adding decorative elements such as a gate or an arbor. These can help enhance the overall aesthetic of the fence and make it more welcoming to guests. For example, a classic wood picket fence with an ornate gate can make your backyard seem more inviting to your friends and family.

Cost

The type of wood used to make a wooden fence will play an important role in its overall cost. Pine and spruce are typically the cheapest options, while redwood or tropical hardwoods are the most expensive. Some woods, like western red cedar or white oak, are naturally water-resistant and will need less maintenance, so they can save homeowners money in the long run. Other woods, like cypress or black locust, require more regular maintenance because they are more susceptible to moisture.

Depending on the style of fence, add-ons can also increase the cost. For example, adding a gate to a wood fence may increase the price by $150 to $1,000, depending on the size and style of the gate. In addition, labor costs are a significant factor in the total cost of a wood fence. Most contractors charge between $5 to $15 per square foot for labor, which can add up quickly when building a large fence.

Wood fences are made up of a number of different components, including posts, rails, and pickets. Posts are the most critical component because they are the first element to come into contact with the soil, which can cause rot over time. For this reason, they are usually made from pressure-treated wood or woods that are naturally resistant to rot, such as redwood and cedar.

The rails are the next component, and they determine how much support a wooden fence will have. While most fence-builders will fasten the rails to the posts, some choose to install them separately. Finally, the in-fill boards are the most visible part of a wood fence. These can be made from a variety of materials, including pine, spruce, and cypress. Most in-fill boards are painted or stained, which can add a touch of elegance to any home.